| LIBROW | ® |
| Products | Solutions | Vehicles | Articles | Inquiry | Contacts | My account |
Article 1
Median filter
Category. Digital signal and image processing (DSP and DIP) software development.
Abstract. The article is a practical guide for median filter understanding and implementation. Article contains theory, C++ source code, programming instructions and sample applications.
Reference. Case study: 3D median filter — ultrasound image despeckling.
Limited offer
Professional Librow Calculatorvisit
for free
- Bessel functions
- gamma function
- complex numbers
7.4 MB for Windows
 |
Download median filter for Win32 (zip, 603 kB) |
 |
Download median filter C++ source code (zip, 2 kB) |

1. Introduction to median filter
Median filter is windowed filter of nonlinear class, which easily removes destructive noise while preserving edges. The basic idea behind filter is for any element of the signal (image) look at its neighborhood and pick up the element most similar to others. Median filter in its properties resembles mean filter, or average filter, but much better in treating “salt and pepper” noise and edge preserving. On the other hand median filter is often used for speckle noise reduction but there are more effective techniques like diffusion filter though more complicated. To understand how to implement median filter in practice, let us start with window idea.
2. Filter window or mask
Let us imagine, you should read a letter and what you see in text restricted by hole in special stencil like this.
 Fig. 1. First stencil.
So, the result of reading is sound [t]. Ok, let us read the letter again, but with the help of another stencil:
 Fig. 2. Second stencil.
Now the result of reading t is sound [ð]. Let us make the third try:
 Fig. 3. Third stencil.
Now you are reading letter t as sound [θ].
What happens here? To say that in mathematical language, you are making an operation (reading) over element (letter t). And the result (sound) depends on the element neighborhood (letters next to t).
And that stencil, which helps to pick up element neighborhood, is window! Yes, window is just a stencil or pattern, by means of which you are selecting the element neighborhood — a set of elements around the given one — to help you make decision. Another name for filter window is mask — mask is a stencil, which hides elements we are not paying attention to.
In our example the element we are operating on positioned at leftmost of the window, in practice however its usual position is the center of the window.
Let us see some window examples. In one dimension.
 Fig. 4. Window or mask of size 5 in 1D.
In two dimensions.
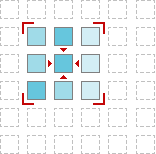 Fig. 5. Window or mask of size 3×3 in 2D.
In three dimensions... Think about building. And now — about room in that building. The room is like 3D window, which cuts out some subspace from the entire space of the building. You can find 3D window in volume (voxel) image processing.
 Fig. 6. Window or mask of size 3×3×3 in 3D.
3. Understanding median filter
Now let us see, how to “pick up element most similar to others”. The basic idea is simple — order elements and take the middle one. For instance, let us find the median for the case, depicted in fig. 7.
 Fig. 7. Taking the median.
And that is all. Yes, we just have filtered 1D signal by median filter! Let us make resume and write down step-by-step instructions for processing by median filter.
Median filter algorithm:
- Place a window over element;
- Pick up elements;
- Order elements;
- Take the middle element.
Now, when we have the algorithm, it is time to write some code — let us come down to programming.
4. 1D median filter programming
In this section we develop 1D median filter with window of size 5. Let us have 1D signal of length N as input. The first step is window placing — we do that by changing index of the leading element:
//   Move window through all elements of the signal
for (int i = 2; i < N - 2; ++i)
Pay attention, that we are starting with the third element and finishing with the last but two. The problem is we cannot start with the first element, because in this case the left part of the filter window is empty. We will discuss below, how to solve that problem.
The second step is picking up elements around, ok:
//   Pick up window elements
for (int j = 0; j < 5; ++j)
   window[j] = signal[i - 2 + j];
The third step is putting window elements in order. But we will use a code optimization trick here. Everything we need is middle element. So, it is enough to order just a half of elements. Great:
//   Order elements (only half of them)
for (int j = 0; j < 3; ++j)
{
   //   Find position of minimum element
   int min = j;
   for (int k = j + 1; k < 5; ++k)
      if (window[k] < window[min])
         min = k;
   //   Put found minimum element in its place
   const element temp = window[j];
   window[j] = window[min];
   window[min] = temp;
}
The final step — take the middle:
//   Get result - the middle element
result[i - 2] = window[2];
At last, let us write down the entire algorithm as function:
//   1D MEDIAN FILTER implementation
//     signal - input signal
//     result - output signal
//     N      - length of the signal
void _medianfilter(const element* signal, element* result, int N)
{
   //   Move window through all elements of the signal
   for (int i = 2; i < N - 2; ++i)
   {
      //   Pick up window elements
      element window[5];
      for (int j = 0; j < 5; ++j)
         window[j] = signal[i - 2 + j];
      //   Order elements (only half of them)
      for (int j = 0; j < 3; ++j)
      {
         //   Find position of minimum element
         int min = j;
         for (int k = j + 1; k < 5; ++k)
            if (window[k] < window[min])
               min = k;
         //   Put found minimum element in its place
         const element temp = window[j];
         window[j] = window[min];
         window[min] = temp;
      }
      //   Get result - the middle element
      result[i - 2] = window[2];
   }
}
Type element could be defined as:
typedef double element;5. Treating edges
For all window filters there is some problem. That is edge treating. If you place window over first (last) element, the left (right) part of the window will be empty. To fill the gap, signal should be extended. For median filter there is good idea to extend signal or image symmetrically, like this:
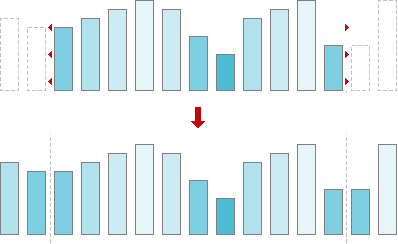 Fig. 8. Signal extension.
So, before passing signal to our median filter function the signal should be extended. Let us write down the wrapper, which makes all preparations.
//   1D MEDIAN FILTER wrapper
//     signal - input signal
//     result - output signal
//     N      - length of the signal
void medianfilter(element* signal, element* result, int N)
{
   //   Check arguments
   if (!signal || N < 1)
      return;
   //   Treat special case N = 1
   if (N == 1)
   {
      if (result)
         result[0] = signal[0];
      return;
   }
   //   Allocate memory for signal extension
   element* extension = new element[N + 4];
   //   Check memory allocation
   if (!extension)
      return;
   //   Create signal extension
   memcpy(extension + 2, signal, N * sizeof(element));
   for (int i = 0; i < 2; ++i)
   {
      extension[i] = signal[1 - i];
      extension[N + 2 + i] = signal[N - 1 - i];
   }
   //   Call median filter implementation
   _medianfilter(extension, result ? result : signal, N + 4);
   //   Free memory
   delete[] extension;
}
As you can see, our code takes into account some practical issues. First of all we check our input parameters — signal should not be NULL, and signal length should be positive:
//   Check arguments
if (!signal || N < 1)
   return;
Second step — we check case N=1. This case is special one, because to build extension we need at least two elements. For the signal of 1 element length the result is the signal itself.
As well pay attention, our median filter works in-place, if output parameter result is NULL.
//   Treat special case N = 1
if (N == 1)
{
   if (result)
      result[0] = signal[0];
   return;
}
Now let us allocate memory for signal extension.
//   Allocate memory for signal extension
element* extension = new element[N + 4];
And check memory allocation.
//   Check memory allocation
if (!extension)
   return;
Now we are building extension.
//   Create signal extension
memcpy(extension + 2, signal, N * sizeof(element));
for (int i = 0; i < 2; ++i)
{
   extension[i] = signal[1 - i];
   extension[N + 2 + i] = signal[N - 1 - i];
}
Finally, everything is ready — filtering!
//   Call median filter implementation
_medianfilter(extension, result ? result : signal, N + 4);
And to complete the job — free memory.
//   Free memory
delete[] extension;
Since we are using memory management function from standard library, we should include its header.
#include <memory.h>6. 2D median filter programming
In 2D case we have 2D signal, or image. The idea is the same, just now median filter has 2D window. Window influences only the elements selection. All the rest is the same: ordering elements and picking up the middle one. So, let us have a look at 2D median filter programming. For 2D case we choose window of 3×3 size.
//   2D MEDIAN FILTER implementation
//     image  - input image
//     result - output image
//     N      - width of the image
//     M      - height of the image
void _medianfilter(const element* image, element* result, int N, int M)
{
   //   Move window through all elements of the image
   for (int m = 1; m < M - 1; ++m)
      for (int n = 1; n < N - 1; ++n)
      {
         //   Pick up window elements
         int k = 0;
         element window[9];
         for (int j = m - 1; j < m + 2; ++j)
            for (int i = n - 1; i < n + 2; ++i)
               window[k++] = image[j * N + i];
         //   Order elements (only half of them)
         for (int j = 0; j < 5; ++j)
         {
            //   Find position of minimum element
            int min = j;
            for (int l = j + 1; l < 9; ++l)
            if (window[l] < window[min])
               min = l;
            //   Put found minimum element in its place
            const element temp = window[j];
            window[j] = window[min];
            window[min] = temp;
         }
         //   Get result - the middle element
         result[(m - 1) * (N - 2) + n - 1] = window[4];
      }
}
7. Treating edges in 2D case
As in 1D case in 2D case we should extend our input image as well. To do that we are to add lines at the top and at the bottom of the image and add columns to the left and to the right.
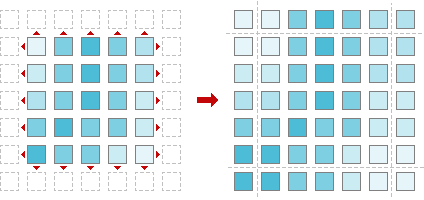 Fig. 9. Image extension.
Here is our wrapper function, which does that job.
//   2D MEDIAN FILTER wrapper
//     image  - input image
//     result - output image
//     N      - width of the image
//     M      - height of the image
void medianfilter(element* image, element* result, int N, int M)
{
   //   Check arguments
   if (!image || N < 1 || M < 1)
      return;
   //   Allocate memory for signal extension
   element* extension = new element[(N + 2) * (M + 2)];
   //   Check memory allocation
   if (!extension)
      return;
   //   Create image extension
   for (int i = 0; i < M; ++i)
   {
      memcpy(extension + (N + 2) * (i + 1) + 1,
         image + N * i,
         N * sizeof(element));
      extension[(N + 2) * (i + 1)] = image[N * i];
      extension[(N + 2) * (i + 2) - 1] = image[N * (i + 1) - 1];
   }
   //   Fill first line of image extension
   memcpy(extension,
      extension + N + 2,
      (N + 2) * sizeof(element));
   //   Fill last line of image extension
   memcpy(extension + (N + 2) * (M + 1),
      extension + (N + 2) * M,
      (N + 2) * sizeof(element));
   //   Call median filter implementation
   _medianfilter(extension, result ? result : image, N + 2, M + 2);
   //   Free memory
   delete[] extension;
}
8. Median filter library
Now we have four functions, two of them are for processing 1D signals by median filter, and other two are for filtering 2D images. It is time to put everything together and create small median filter library. Let us write code for header file.
#ifndef _MEDIANFILTER_H_
#define _MEDIANFILTER_H_

//   Signal/image element type
typedef double element;

//   1D MEDIAN FILTER, window size 5
//     signal - input signal
//     result - output signal, NULL for inplace processing
//     N      - length of the signal
void medianfilter(element* signal, element* result, int N);

//   2D MEDIAN FILTER, window size 3x3
//     image  - input image
//     result - output image, NULL for inplace processing
//     N      - width of the image
//     M      - height of the image
void medianfilter(element* image, element* result, int N, int M);

#endif
Our library is ready. The code we have written is good both for Linux/Unix and Windows platforms. You can download full median filter library source code here:
 |
Download median filter C++ source code (zip, 2 kB) |
Full listings of library files are available online as well:
- Appendix A.1. Median filter source code — medianfilter.h — file of declarations;
- Appendix A.2. Median filter source code — medianfilter.cpp — file of implementation.
And now — a couple of applications to play around!
9. Color median filter: image restoration
 |
Download median filter for Win32 (zip, 603 kB) |
We have created a couple of applications to show median filter capabilities in restoration images corrupted by destructive noise. The sample package includes 4 files — two applications, sample image and description:
- restorer.exe — median filter,
- corrupter.exe — destructive noise generator,
- sample.bmp — 24-bit sample image,
- readme.txt — description.
Be aware of the fact, that this sample uses OpenGL, so it should be installed on your computer.
10. Step 1: prepare corrupted image
To prepare corrupted image you have two choices. First choice is you can corrupt the image with destructive noise. Start up corrupter.exe application and load image to be corrupted. Choose Set >> Corruption... or click N button in toolbar and set noise level at 5–15%. Click OK. Then save corrupted image.
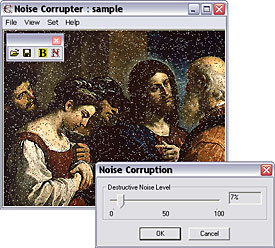 Fig. 10. Corruption by destructive noise.
Median filter can filter out not only destructive noise but scratches as well. This is the second choice. Open MS Paint: Start >> Programs >> Accessories >> Paint, load some .bmp file. Pick up pencil, choose white color and scratch the image. Save corrupted image.
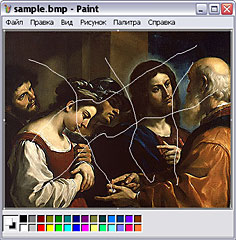 Fig. 11. Corruption by scratches.
11. Step 2: restore corrupted image
Start up restorer.exe application. Load the saved corrupted image. Apply median filter by choosing Set >> Filter or clicking F-button in toolbar. See the result. If necessary, filter the image once more.
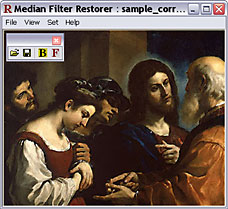 Fig. 12. Image restored by median filter.
|
|
|||||||||||||
|
|||||||||||||


